 I shouldn’t have been surprised to discover that the bread I’ve been making for my family costs between $1.00 and $1.50 per loaf. Comparable bread at the grocer/bakery will run $4.00 or more a loaf. The variation in price depends on add-ins which provide flavor and texture. This recipe is simple, quick and tasty. We bake it twice a week. This is a great project to have the kids help you with, they LOVE to knead and roll the dough. The dough making only takes 10 minutes or so (the rest is rising/baking time). This is a modified version of a recipe found at Sweet Simple Living.
Simple Whole Wheat Bread (Makes 2 large loaves)
In a large bowl combine (I use the bowl from my stand mixer)
- 1 Tbs Honey or Agave
- 3 Tbs Active Dry Yeast
- 1 1/3 cup warm water (about 105-115 degrees Fahrenheit)
Allow yeast to activate and bubble for about five minutes.
Turn mixer on low and begin adding:
- Another 1 1/3 cup warm water
- 1/2 cup olive oil
- 1/2 cup molasses
- 1/2 cup honey or agave
- 2 tsp Kosher salt
Now it’s time for your add ins… whatever you add here will reduce your overall amount of wheat flour added at the end. If you want a simple WW Bread with no seeds, skip this part and add closer to the 7 cups of WW flour at the end. We add:
- 1/2 cup sunflower kernals
- 1/2 cup slightly crushed flax seeds (I mix golden and black)
- 1/4 cup poppyseeds
- 1/4 quinoa
While continuing to mix on low speed, begin adding:
- Whole Wheat flour, 1 cup at a time.
It may take up to 7 cups… I usually end up adding 5 1/2-6 with the add in seeds. If your mixer won’t hold the full amount, you may have to remove and finish the mixing process by hand.
You know you have added enough flour when the dough becomes less sticky and more like, well dough. :) Now, turn it out on a lightly floured surface and knead for 8-10 minutes. It should be quite elastic and smooth. Place your ball of dough into an oiled bowl and allow to rise for an hour or until double in size. (See my tip below for proofing your dough.)
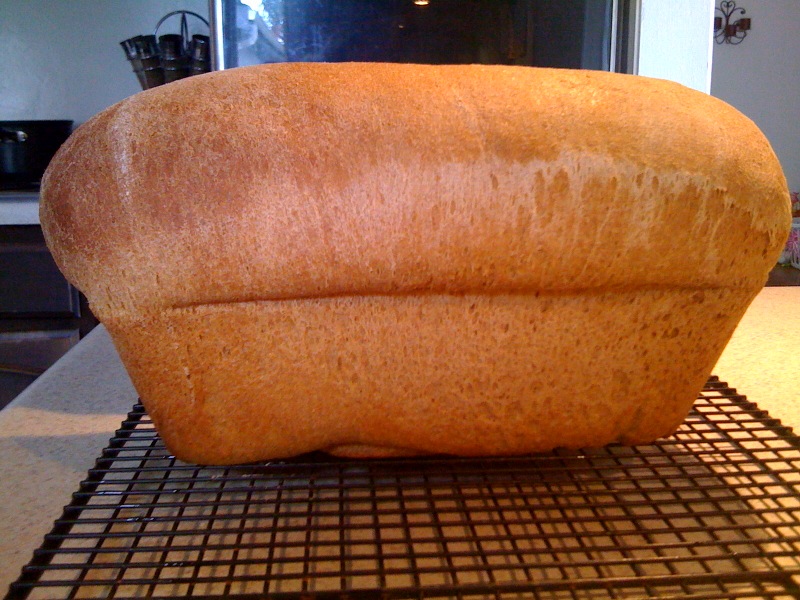
After the dough has risen, punch down and remove from the pan to a lightly floured surface. Now, use a knife to divide your dough into two halves. Roll each half out into a rectangle about 9 inches wide by 14 inches long. You will now roll the rectangles of dough jelly-roll style, pinch the ends closed and place in a prepared bread pan. I like to brush a small amount of egg white and water mixture on the top prior to rolling to help the bread stick together nicely and not leave gaps while baking.
Now allow your bread to rise again for about 30 minutes, then bake at 375 degrees Fahrenheit for 30 minutes. Cool in the pan for 10 minutes or so prior to turning out onto a cooling rake. The bread slices best when fully cooled, but I can never resist a slice or two right out of the oven!
My proofing trick is to place a small pan of water onto the rear burner and boil. Once its at a rolling boil, turn the burner off. Place the dough next to the pan of water. Once the burner is no longer red, lay a towel over the water pan and dough. The combination of heat and steam provide an ideal situation for rising.
Eat Well. Be Well.
Jamie, I liked your post. I just started baking bread last month. I’ve tried adding walnuts but next time I think I’ll take your suggestion and add quinoa or flax seeds. Any tricks for making the bread slice easier? I find that especially as the loaf gets smaller it is harder to cut. I guess with that $4 at the store you are paying in part for the convenience of slicing. But I much much prefer my own bread, it’s tastier and much cheaper!
Ryan- to slice bread easiest… allow it to FULLY cool (I have a hard time with this because I want to jump right in and gobble up a whole, warm loaf!). Once it has cooled, use a serrated knife. Apply light pressure and work in a sawing motion while holding the loaf steady with your other hand. Sometimes, I find it easier to turn the loaf onto its side to slice instead of top down.